EUR
EUR USD
USD GBP
GBP CAD
CAD AUD
AUD HKD
HKD JPY
JPY KRW
KRW SGD
SGD NZD
NZD THB
THB TWD
TWD 繁體中文
繁體中文 日本語
日本語 한국어
한국어 ไทย
ไทย Français
 Español
 Deutsch
 Português
 italiano
 Nederlands
 English



By UnblockTechTVBox | 22 May 2024 | 0 Comments
How to Calibrate Your TV for the Best Picture?
When you get a new TV, the default settings probably won’t be fully optimized out of the streaming box. If you want to watch movies and TV shows the way the director intended, there are several settings that you might need to change. Here are the best picture settings for every major TV brand and how to change them yourself.
Step 1: Access Picture Settings
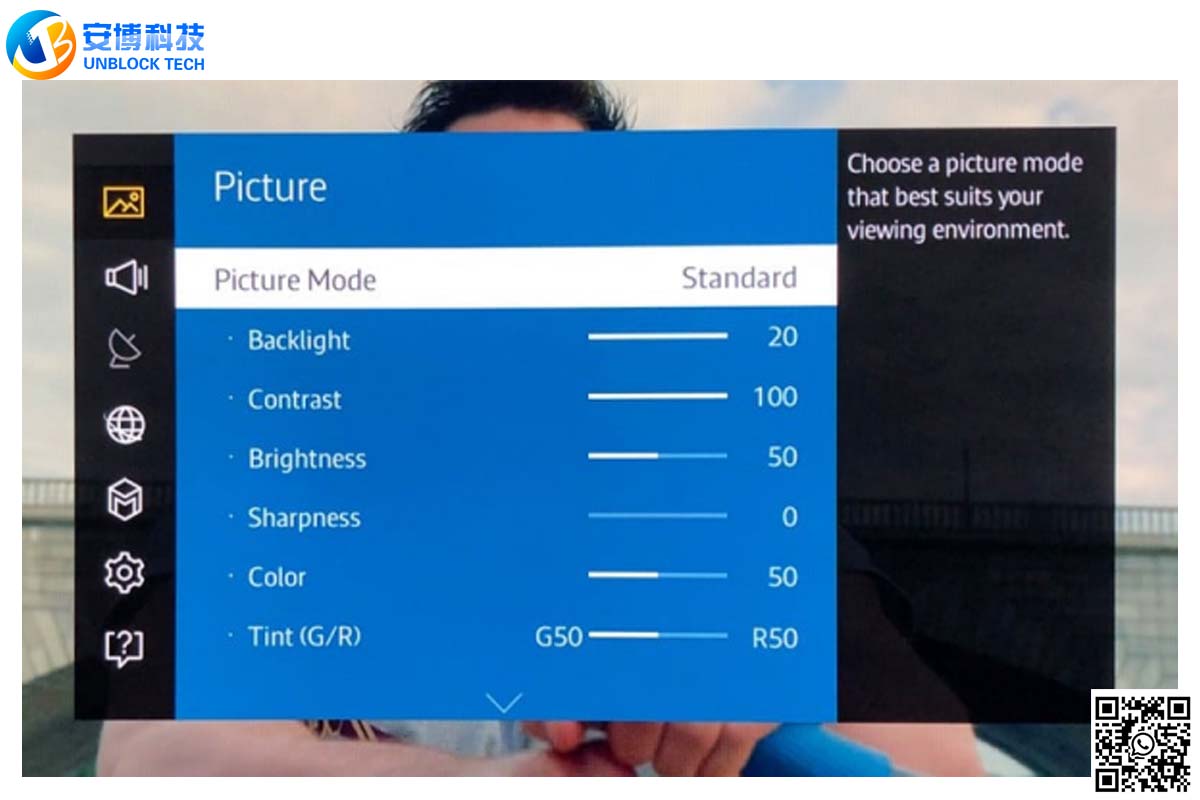
To start, press the “Menu,” “Settings,” or “Home” button on your remote control. Navigate to “Picture Settings” or a similar option.

Step 2: Choose the Right Picture Mode
- Movie/Cinema Mode: Generally the most accurate, providing colors and brightness levels as intended by content creators. Ideal for dark rooms but might appear too warm and dark in brightly lit environments.
- Dynamic/Vivid Mode: Best for very bright rooms. Increases brightness but can distort colors.
- Normal/Standard Mode: A balanced option suitable for various lighting conditions, neither too bright nor too dark.
Step 3: Adjust Brightness and Backlight
- Brightness: Set to around 50%. Too high can wash out blacks; too low makes the image too dark.
- Backlight: Adjust based on room lighting. Lower in dark rooms to reduce eye strain, higher in bright rooms for better visibility. On OLED TVs, use the "OLED Light" control instead.
Step 4: Set Contrast
- Contrast: Set as high as possible without losing detail in bright areas. Typically, start at 100% and reduce until you see detail in bright scenes.
Step 5: Configure Sharpness
- Sharpness: Set to 0% or a low value. High sharpness can create artificial edges and halos around objects. Low settings ensure more natural motion and clarity.
Step 6: Adjust Color
- Color: Set to around 50%. Too high makes colors look unrealistic, too low makes the image look dull. Adjust until the colors look natural.
Step 7: Use Advanced Settings (If Available)
- White Balance and Color Temperature: Fine-tune these settings for more accurate colors.
- Gamma: Set to 2.2 for a balance between dark and bright scenes.
- HDR Settings: Enable and adjust for HDR content if supported by your TV.
Optional: Local Dimming
- Local Dimming: Enhances contrast by dimming parts of the screen that should be darker. Toggle it on and off during a scene with both dark and bright areas to see which setting you prefer.
Step-by-Step Summary for Each Major Setting:
- Picture Mode: Movie/Cinema for accuracy, Dynamic/Vivid for bright rooms, Standard for versatility.
- Brightness: 50% (default level).
- Backlight: Adjust to room lighting; lower for dark, higher for bright.
- Contrast: Start at 100%, reduce until detail in bright areas is visible.
- Sharpness: 0% or low setting to avoid artificial enhancements.
- Color: 50%, adjust for natural look.
- Advanced Settings: White Balance, Color Temperature, Gamma (2.2), HDR Settings as needed.
- Local Dimming: Adjust for better contrast if your TV supports it.

Final Tips
- Firmware Updates: Keep your TV’s firmware up-to-date for the best performance and new features.
- High-Quality Sources: Use good HDMI cables and high-resolution content.
- Professional Calibration: For the best results, consider professional calibration.
By following these steps, you can optimize your TV’s picture settings to enjoy movies and shows as intended by their creators.